This document is intended as an aid to cleaning up invalid NPA-NXX combinations
in a CPR.
Introduction
Due to the rapid consumption of NPA-NXXs, especially for cellular service,
new NPAs are constantly being introduced to the telphony network.
This often results in an
NPA Overlay or Split.
As a result of this, NPA-NXX combinations that were valid
on one day may become invalid the next day, because a split or overlay has
moved the NXX to a new NPA.
For 8MS users that use NPA-NXX routing within a CPR, it is possible for
a CPR to be valid and working in the telephony network and then suddenly,
after a split or overlay has occurred, the CPR is invalid. Active toll-free
numbers will continue to process calls correctly in the
SCPs.
However, if a user attempts to change the routing of an existing
toll-free number or add a new number that uses this routing, SMS/800
validation will fail when attempting to activate the number.
This is true for both
CAD records in
8MS Routing Sets
and
PAD records in
SMS Templates.
If you attempt to point an additional number at an existing 8MS Routing Set
or an Active Template,
via
Copy Record,
Record Management: SMS CAD
or
Record Management: SMS PAD
and the record has invalid NPA-NXXs, the transaction will fail.
Typically, you will see an error message like the following.
800-xxx-xxxx: Customer record updated (03/31/16 09:15A/C).
Record failed validation but was stored at SMS/800.
Pointer is invalid due to Template's CPR/LAD has invalid data. You
will need to fix and update the Template Record and then re-update the
Pointer Record. (E4549)
Context: POINTER IS INVALID DUE TO TEMPLATE RECORD HAS INVALID DATA.
To fix this problem, it is necessary to remove any invalid
NPA-NXX values referenced in the CPR. Fortunately, 8MS knows all
valid NPA-NXX pairs so it can assist in finding the offending values.
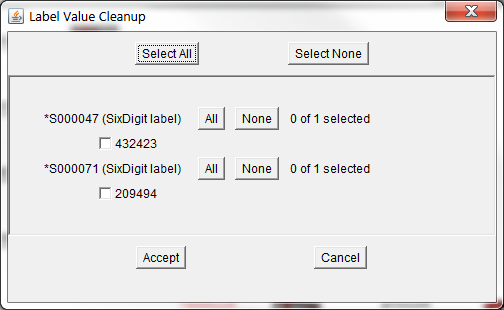
Most often these values
will be found as the content of one or more labels. It is also
possible that the invalid values will be found directly on a branch;
either on an NXX, SixDigit or a TenDigit node.
Depending on whether you're working with an SMS Template or an
8MS Routing Set, you'll follow the instructions in one of the
sections shown below.
SMS Templates may be confusing if you have not worked with
them before. If you are not familiar with
SMS Templates, it is highly recommended that you read the
tutorial on
Managing SMS Templates
and the
SMS Template
definition in the
Terminology section of the
user guide.
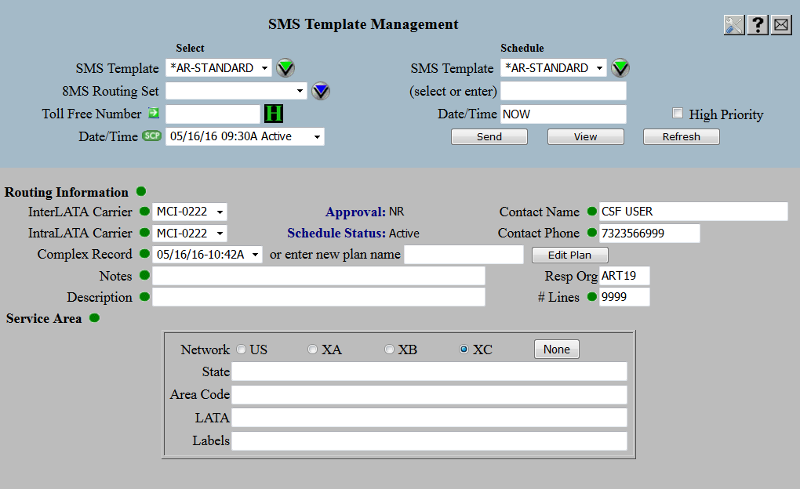
Selecting the SMS Template
Go to the
SMS Template Management screen
and select the desired SMS Template.
You should see something like the following.
Now click on the Edit Plan button to the right of the
Complex Record field.
You will probably need to accept several Java warning messages
and then EditPlan should appear.
EditPlan is implemented as a Java Applet. There are limitations
in running Java Applets within browsers.
To see details on browser and applet support, please refer
to the following FAQ questions and answers:
*AR-STANDARD: Change failed validation.
vr.c or def (6-digit, 10-digit, Tel): The 6-digit (NPANXX) combination must
be known to SMS, like 908699. (E1107)
Context: BAD:432423
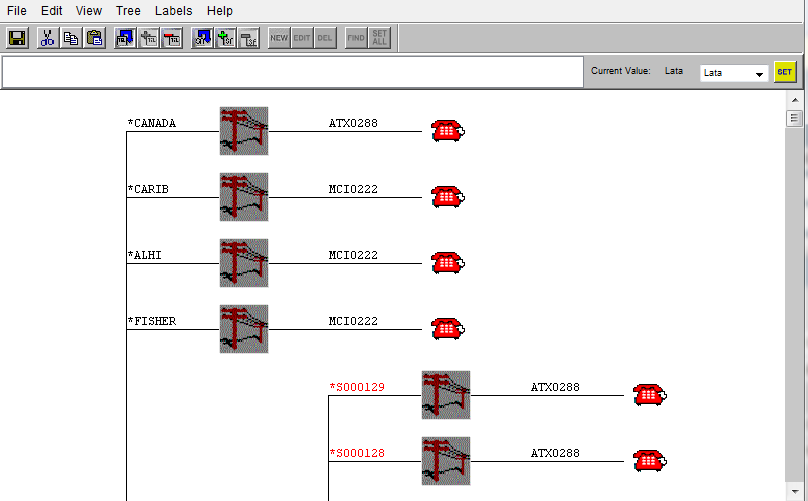
In cases such as this, you must find the branch or branches that contains
this branch value and remove or correct it.
Currently, EditPlan has no find feature for branch values. To work around
this, since you know the error is limited to
NXX, SixDigit and TenDigit nodes, you will need to scan your
CPR for any of these nodes and check the branches for the invalid value.
One workaround for the lack of a find branch value feature is to
generate a pdf document using the View button and use the
pdf viewer find feature. Search the pdf for the invalid value.
Once you have identified the location of the branch, you may then
navigate to that branch in EditPlan and remove or correct it.
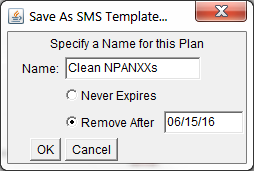
Click on the EditPlan File menu, then the Save As menu and finally
click on the Save as SMS Template Plan button.
Enter a new local plan name in the Name field and click on OK.
It is at the user's discretion whether or not the local
CPR be set to expired. The 8MS support team suggested that
the Remove After field be left with it's default, which
will cause the CPR to be removed after a suitable amount of time.
This plan will serve no purpose once the CPR has been sent up
to SMS/800 with the SMS Template.
Click on the EditPlan File menu, then the Quit button to exit EditPlan.
You should now be back at the Template Management screen.
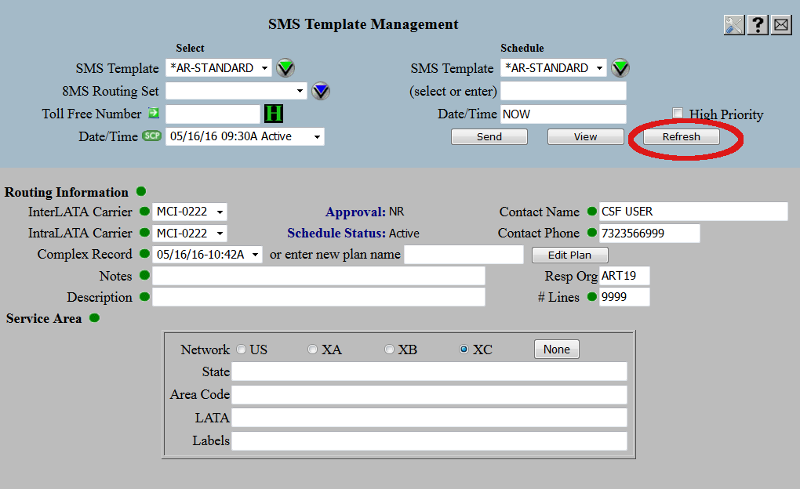
Updating the SMS Template
Now that the CPR has had all invalid values removed from it, you will need
to update the SMS Template with this modified CPR. To do this you will
select the new local CPR from the Complex Record drop-down list.
Click on the Refresh button on the upper right. This will
cause the Template Management screen to repopulate the
Complex Record list with the newly created local CPR.
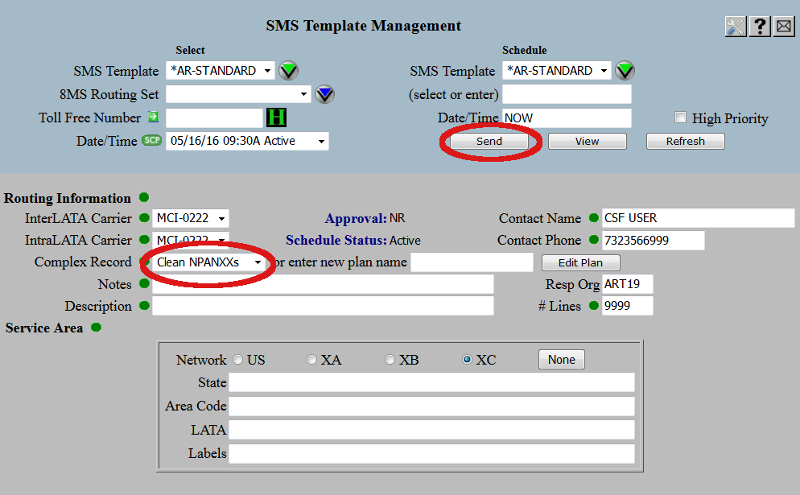
Select the newly created Complex Record and click on
the Send button to update the SMS Template at SMS/800.
After the new SMS Template record has become Active, use
Copy Record
to point your toll-free number(s) at this SMS Template.
This completes the process for removing invalid NPA-NXXs in an SMS Template.
An 8MS Routing Set
is created by the 8MS system when a new, unique routing
(CAD,
LAD, and
CPR)
is encountered after successfully sending that routing to SMS/800.
Users may never explicitely create an 8MS Routing Set; it is only the system
that creates 8MS Routing Sets.
Once created, an 8MS Routing Set may never be modified.
However, it is possible to open the routing of an 8MS Routing Set,
modify it and send the modified routing up to SMS/800 with a toll-free
number. If this new routing is unique, a new 8MS Routing Set will be created
and will be associated with this toll-free number.
8MS Routing Sets may be confusing if you have not worked with
them before. If you are not familiar with
8MS Routing Sets, it is highly recommended that you read the
tutorial on
Managing 8MS Routing Sets
and the
8MS Routing Sets
definition in the
Terminology section of the
user guide.
Selecting the 8MS Routing Set
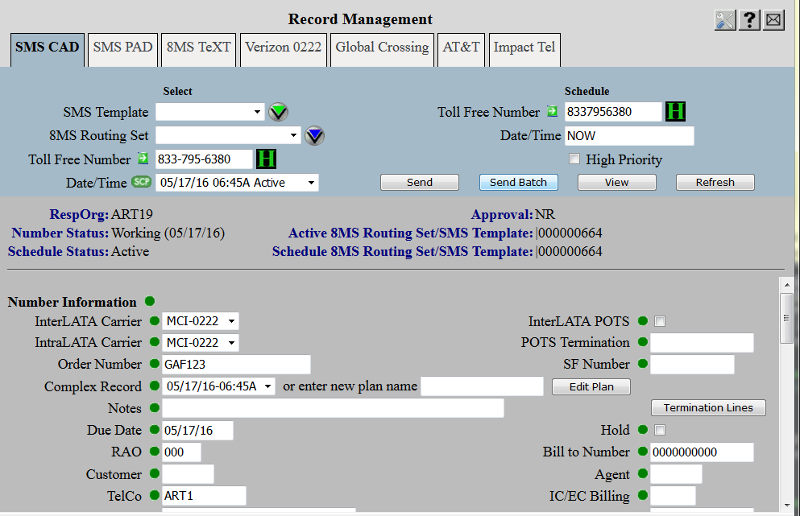
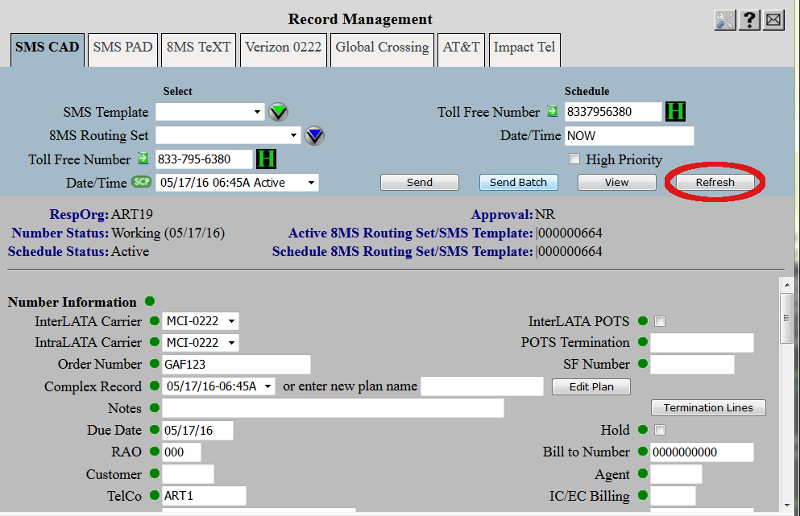
Go to the
Record Management: SMS CAD
screen and select a toll-free number in the desired 8MS Routing Set.
You should see something like the following.
The steps for modifying the CPR are identical to the process described
above in the SMS Template section. The similarities end when you come to the
section on Saving the Local SMS Template Cpr, so do not follow
that step or any beyond it.
To make this process easy to follow, click on each of the links below.
They will direct you to the appropriate sections above.
When you have completed those steps, return here.
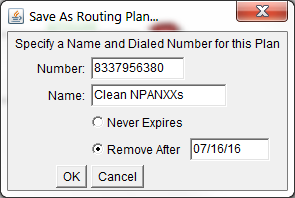
Click on the EditPlan File menu, then the Save As menu and finally
click on the Save as Dialed Number Plan button.
Enter a new local plan name in the Name field and click on OK.
It is at the user's discretion whether or not the local
CPR be set to expired. The 8MS support team suggested that
the Remove After field be left with it's default, which
will cause the CPR to be removed after a suitable amount of time.
This plan will serve no purpose once the CPR has been sent up
to SMS/800 with the Toll-Free Number.
Click on the EditPlan File menu, then the Quit button to
exit EditPlan.
You should now be back at the Record Management: SMS CAD screen.
Updating the Toll-Free Number
Now that the CPR has had all invalid values removed from it, you will need
to send this modified CPR and all associated CAD data to SMS/800.
To do this you will select the new local CPR from the
Complex Record drop-down list.
Click on the Refresh button on the upper right. This will
cause the Record Management: SMS CAD screen to repopulate the
Complex Record list with the newly created local CPR.
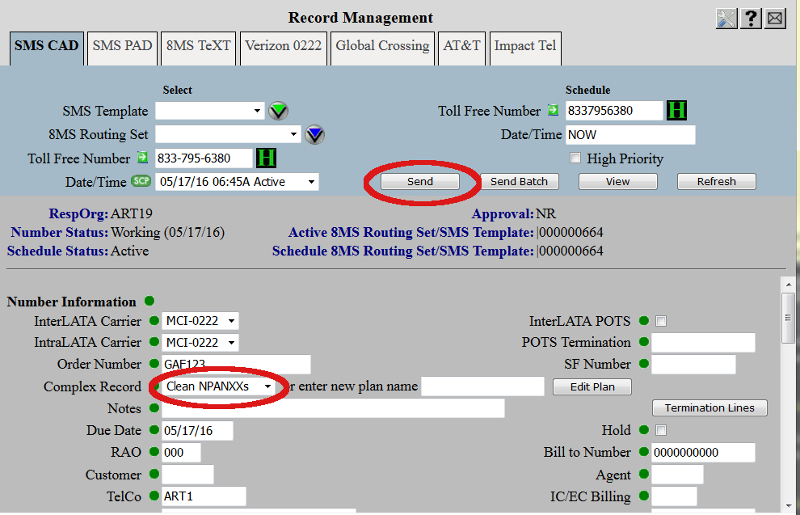
Select the newly created Complex Record and click on
the Send button to update the toll-free number record at SMS/800.
After the new toll-free number record has become Active
it is likely that a new 8MS Routing Set has been created;
this is the 8MS Routing Set associated with this toll-free number.
The name of this 8MS Routing Set will be a system-generated name
consisting of the | (pipe) symbol followed by a sequence of numbers.
The middle area of the Record Management: SMS CAD screen
will show this system-generated name to the right of the
Active 8MS Routing Set/SMS Template label. Note this
name as you will need it if you are going to rename this
8MS Routing Set.
Keep in mind that a new 8MS Routing Set has been created. It is
this 8MS Routing Set that has had the invalid NPA-NXXs removed.
Be aware that the old 8MS Routing Set has not been modified and
is invalid!
Renaming the New 8MS Routing Set
It is possible to rename the new 8MS Routing Set to the old name, but
this should be done with discretion.
The process of naming a new 8MS Routing Set to a name already
in use requires changing the name of the old 8MS Routing Set as
well. This means that any toll-free numbers that use the old
version of this 8MS Routing Set will now reference the
changed name and will still contain the invalid NPA-NXXs. It
is suggested that all these toll-free numbers should be
updated to use the new 8MS Routing Set.
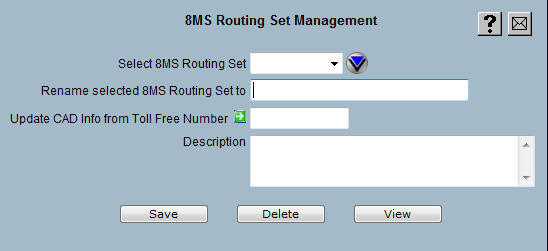
An 8MS Routing Set may be renamed by going to the
8MS Routing Set Management
screen. You should see something like the following.
By default only the most recently used 8MS Routing Sets will be shown
in the Select 8MS Routing Set drop-down list; these are shown in
recently used order. Select the blue image to the right of the list
to populate the drop-down with all of your 8MS Routing Sets. The
list will now be shown in alpha-numeric order.
Select the old 8MS Routing Set and enter a new name in the
Rename selected 8MS Routing Set field. It is suggested
that you name it using the old name followed by the
string "OLD". For example, if the old name was Standard ATT
then rename this to Standard ATT OLD. When viewing your
8MS Routing Sets, this should then appear just below the new version.
Click on the Save button and the change will be saved; the
old 8MS Routing Set will now have a new name.
Now repeat this process for the newly created 8MS Routing Set.
From the Select 8MS Routing Set drop-down list
select the system-generated name. Enter the new name in the
Rename selected 8MS Routing Set field.
Click on the Save button and the change will be saved; the
new 8MS Routing Set will now have the original name and the old
8MS Routing Set will have the modified name.
At your company's discretion, you may update all other toll-free numbers
that currently point at the old 8MS Routing Set.
This completes the process for removing invalid NPA-NXXs in an 8MS Routing Set.