The top section of the Sinch screen appears as follows:

This section is used for sending a single toll-free number or a batch of numbers to the Sinch carrier. Sending records is discussed below.
The administrative and routing information section is broken out by the Activate and Change actions, controlled by tabs.
At the top of this section is the Customer Order Reference field, used for tracking an order. This is available for both actions, while the remaining data are associated with the individual actions. It appears as shown below.

- Activate allows you to activate a new toll-free number.
- Change allows you to modify data for an active toll-free number.
Use the Activate tab when activating a new number that has not yet been loaded onto the Sinch network. The Activate portion of this screen appears as shown below.
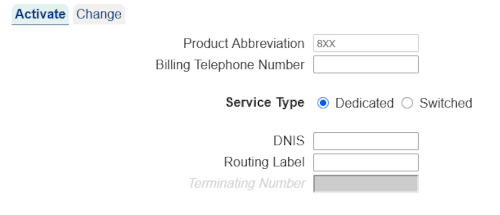
The table below describes the fields for this tab.
| Field | Description |
|---|---|
| Product Abbreviation | Currently, the only valid value for this field is 8XX. This field is read-only and is shown because of the possibility of other values in the future. |
| Billing Telephone Number | A contact number associated with this toll-free number. If specified, this field must be 10 digits. |
| DNIS | The DNIS digits associated with this toll-free number. This field is only needed for a Service Type of Dedicated and is greyed-out when Service Type is set to Switched. |
| Routing Label | The Sinch routing label associated with this toll-free number. This field is only needed for a Service Type of Dedicated and is greyed-out when Service Type is set to Switched. |
| Terminating Number |
The terminating number associated with this toll-free number.
If specified, this field must be 10 digits.
This field is only needed for a Service Type of Switched and is greyed-out when Service Type is set to Dedicated. |
Use the Change tab when modifying information on a number that has already been loaded onto the Sinch network.
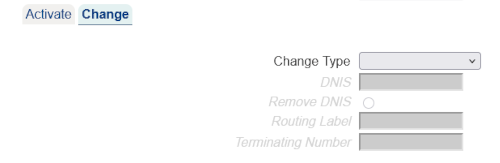
The table below describes the fields for this tab.
| Field | Description |
|---|---|
| Change Type |
The set of fields being modified for this change action.
Each option indicates which field(s) should be
changed at AT&T. Possible values include
All change fields are initially set to read-only. Selecting
the Change Type causes the appropriate fields to
be editable or non-editable.
If the Change Type is modified after entering values in one or more fields, any fields not in the specified change type are cleared out. |
| DNIS | The DNIS digits associated with this toll-free number. |
| Remove DNIS | Selecting a Change Type of Remove DNIS makes the Remove DNIS radio button active. This button may not be unselected; it is only affected by selecting a Change Type |
| Routing Label | The Sinch routing label associated with this toll-free number. |
| Terminating Number | The terminating number associated with this toll-free number. If specified, this field must be 10 digits. |
Once the desired information has been specified, the target toll-free number is entered. This is done by entering your number in the Toll Free Number field at the top of the screen.
Select the  button in the non-scrollable area at the top of the screen.
A message will appear in the response frame (the bottom
area of the screen) indicating the status of the request.
button in the non-scrollable area at the top of the screen.
A message will appear in the response frame (the bottom
area of the screen) indicating the status of the request.
This function allows you to activate, change or move multiple numbers on the Sinch network.
Fill in the appropriate fields as discussed above.
However, instead of entering a toll-free number and hitting the
button,
leave the toll-free number field blank and click the
 button.
The Batch Popup will appear.
See Batches in the
Common Features section
for details on the Batch Popup.
button.
The Batch Popup will appear.
See Batches in the
Common Features section
for details on the Batch Popup.
See Batches in the Common Features section for additional common details on this Batch Popup variation.
The Toll Free Number field under
Schedule section of the top frame can provide a history of the
number entered into the field. Clicking on the
 .
image to the left of the field will produce a popup containing the
change history of the selected number. For more information, see
Number History.
.
image to the left of the field will produce a popup containing the
change history of the selected number. For more information, see
Number History.
There are preferences that may be set to change the behavior of this screen. Refer to Customizing 8MS for how to set User and Company Preferences and see Record Management Preferences for details on customizing this screen.