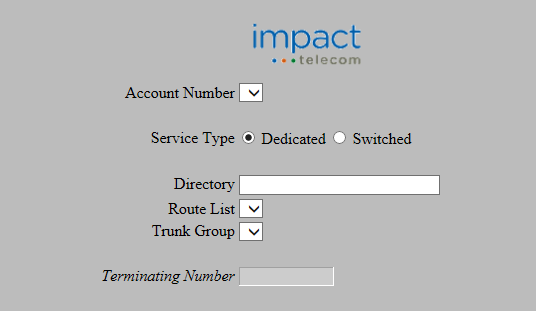
The top section of the Impact Tel screen appears as follows:

At any point you have the option of populating the screen from an existing record. The record may be selected by entering a toll-free number in the Toll Free Number field under the Select area on the left side of this frame. A toll-free number does not need be selected; you may instead enter all the data yourself.
The administrative and routing information section appears as follows:

This section of this screen defines the data required to activate a number at Impact Tel. The table below describes the fields for this section.
| Field | Description |
|---|---|
| Account Number | The Impact Tel account number in which this number is to be activated. |
| Service Type | Indicates whether this is dedicated or switched service. |
| Directory | The Impact Tel directory for this number. This field is only needed for a Service Type of Dedicated and is greyed-out when Service Type is set to Switched. |
| Route List | The Impact Tel route list for this number. This field is only needed for a Service Type of Dedicated and is greyed-out when Service Type is set to Switched. |
| Trunk Group | The Impact Tel route list for this number. This field is only needed for a Service Type of Dedicated and is greyed-out when Service Type is set to Switched. |
| Terminating Number | The POTS number to which this toll-free number should be routed. This field is only needed for a Service Type of Switched and is greyed-out when Service Type is set to Dedicated. |
Once the desired information has been specified, the target toll-free number is entered. This is done by entering your number in the Toll Free Number field on the right Schedule column at the top of the screen.
Select the  button in the non-scrollable area at the top of the screen.
A message will appear in the response frame (the area below the
carrier routing data) indicating the status of the request.
This function allows you to change the routing of more than one toll-free number. The number information from will be sent for the given set of numbers.
Fill in the carrier routing fields as discussed above.
However, instead of entering a toll-free number and hitting the
 button,
leave the toll-free number field blank and click the
 button.
The Batch Popup will appear.
See Batches in the
Common Features section
for details on the Batch Popup.
It is possible that the toll-free number you are currently viewing
has been modified by another user or by the system.
Select the  button to force the screen to repopulate all data for the currently
selected toll-free number.
 .
image to the right of the field will produce a popup containing the
change history of the selected number. For more information, see
Number History.