| 8MS User Guide |
TFNR User Administration |
Main Help Page |
To enable 8MS to communicate with Somos via the Somos TFN Registry API, a Somos login and password needs to be associated with a Company's Resp Orgs. The TFNR User Administration screen provides the ability to set up this login and password within 8MS.
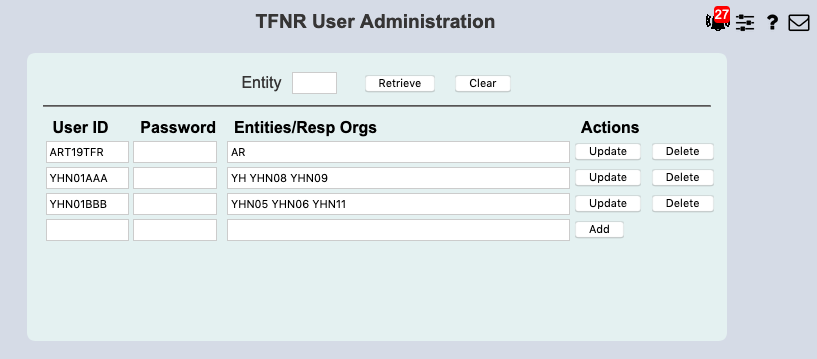
In the menu frame, select the TFNR Admin link located in the System Admin section of the menu. The following will appear in the workspace frame:

If any Somos logins have already been provisioned in 8MS, these will appear, sorted alphabetically by User ID.
The list of User IDs may be filter by Entity. To do this, enter the Entity and select the Retrieve button. Select the Clear button to clear the Entity field and then select the Retrieve button to restore the full list.
To add a new Somos login, data will be entered in the bottom row, the one with the Add button. Enter the User ID, Password and Entities/Resp Orgs that will use this login. The Entities/Resp Orgs field accepts a blank space or comma between items. Each item in this field must be either a 2-alpha Entity or a 5 alpha-numeric Resp Org. When done, select the Add button. The User ID will be added, a success message will be displayed at the bottom of the screen, and the newly added item will be sorted alphabetically in the list of User IDS. The Entities/Resp Orgs field will convert any lower-case items to upper-case, and commas and extra spaces will be replaced by a single space.
To modify the Password or Entities/Resp Orgs for a User ID, make all changes on the appropriate line and then select the Update button. A success message will appear at the bottom of the screen. The Entities/Resp Orgs field will convert any lower-case items to upper-case, and commas and extra spaces will be replaced by a single space.
To modify the User ID enter the new User ID and select the Update button. The old User ID will be deleted and the new one added, a success message will be displayed at the bottom of the screen, and the newly added item will be sorted alphabetically in the list of User IDs.
To delete a User ID, select the Delet3 button. A success message will appear at the bottom of the screen. The User ID will be deleted, a success message will be displayed at the bottom of the screen, and the deleted item will be removed from the list of User IDs.