| 8MS User Guide |
Registration Management |
Main Help Page |
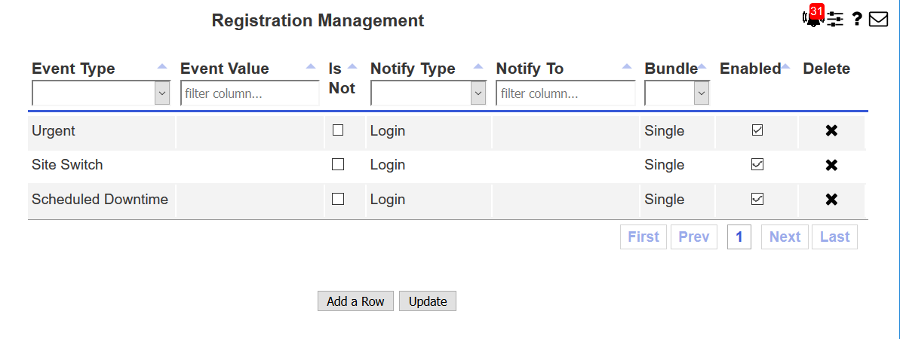
This function allows you to manage your notification registrations. To access this screen, select the Registration Mgmt link located in the Notification Mgmt section of the menu. The following will appear in the workspace frame:

The following is a description of the search criteria:
| Field | Description |
|---|---|
| Event Type | The type of event for which you wish to be notified. Currently supported Event Types include Resp Org Changes, User Modifications, general Bulletins, and Urgent, Site Switch and Scheduled Downtime bulletins. |
| Event Value | Restricts notifications to a particular value for the specified Event Type. Currently supported Event Values include a comma-seperated list of toll-free numbers for Resp Org Change notifications. If no Event Value is specified, then you will receive notifications for all events of this type. |
| Is Not | Restricts notifications to the specified Event Type but for values other than the ones specified in Event Value. |
| Notify Type | The type of notification you wish to receive. Currently supported Notify Types include Email, Text and Login (viewing messages from the Notification Alerts screen). |
| Notify To | For a Notify Type of Email or Text, this is the email address or text address to which the notification is delivered. For Text, the message is sent out as an email and is addressed to mobile-number@carrier-email-domain. For example, if your mobile number is 7323020222 and your carrier is AT&T, your Notify To value would be 7323020222@txt.att.net. Contact your carrier if you are unsure of the the email domain for that carrier. |
| Bundle |
Notifications can be sent as Single (as they occur)
or they can be grouped in Daily or Weekly bundles.
Daily notifications are sent at the end of the day.
Weekly notifications are bundled from Sunday to Saturday
and sent at the end of the day on Saturday.
Users should be cautious when specifying a Notify Type
of Text as you can become overwhelmed with either
a large number of messages or a single very large message.
Specifically:
|
| Enable | To make it easier to manage your registrations, you do not need to delete a registration row to stop those particular notifications. Instead, you can simply disable the particular registration by unchecking the checkbox, and then checking it when you want to receive those notifications again. |
| Delete |
Clicking on the
|
To add a registration, click on the
 button. A new row will
appear at the bottom of the screen. Set all appropriate values for this
registration row.
To modify an existing registration, make all appropriate changes directly to the registration row.
To delete an existing registration, click the X icon to the far right of the registration row.
When you have completed all changes, click the
 button.
All your updates will be performed and a message will appear indicating
the number of adds, modifications and deletes that have occurred.
Please note that no changes will be saved until you have clicked on the
 button.